Cold Contract Replacement and Emergency Sweep Address Setup Guide

This guide is intended for merchant operations and fund security teams. It covers the full workflow for cold contract replacement, emergency sweep address setup, emergency withdrawal address setup, and high-risk fund handling.
You can execute the process in the following order:
- Replace the cold contract (multisig)
- Set the emergency sweep address (multisig)
- Set the emergency withdrawal address (multisig)
- Sweep and withdraw funds from blacklisted sub-contracts
1. Cold Contract Replacement
Overview
The cold contract stores large merchant balances. To avoid contamination from high-risk transactions or other security risks, merchants can replace the cold contract address through multisig. This operation requires two admin wallets (one to create the proposal, one to approve and submit on-chain) to protect fund security.
This section uses the Pro console as an example and explains the full replacement procedure.
- Make sure both admin wallets can log in and have enough gas.
- Make sure the selected network matches the merchant's actual operating network.
Steps
-
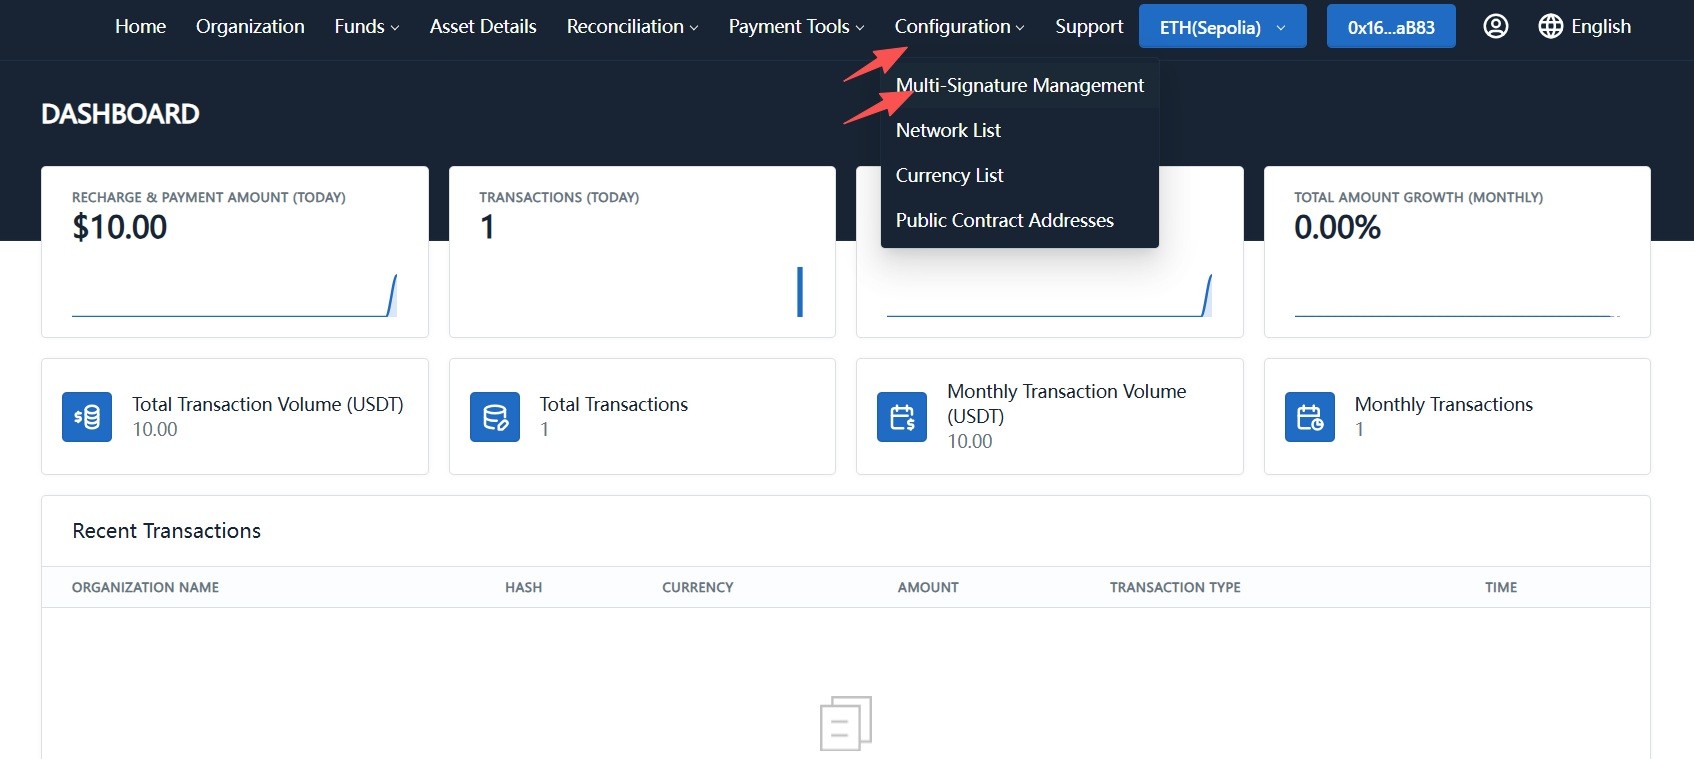
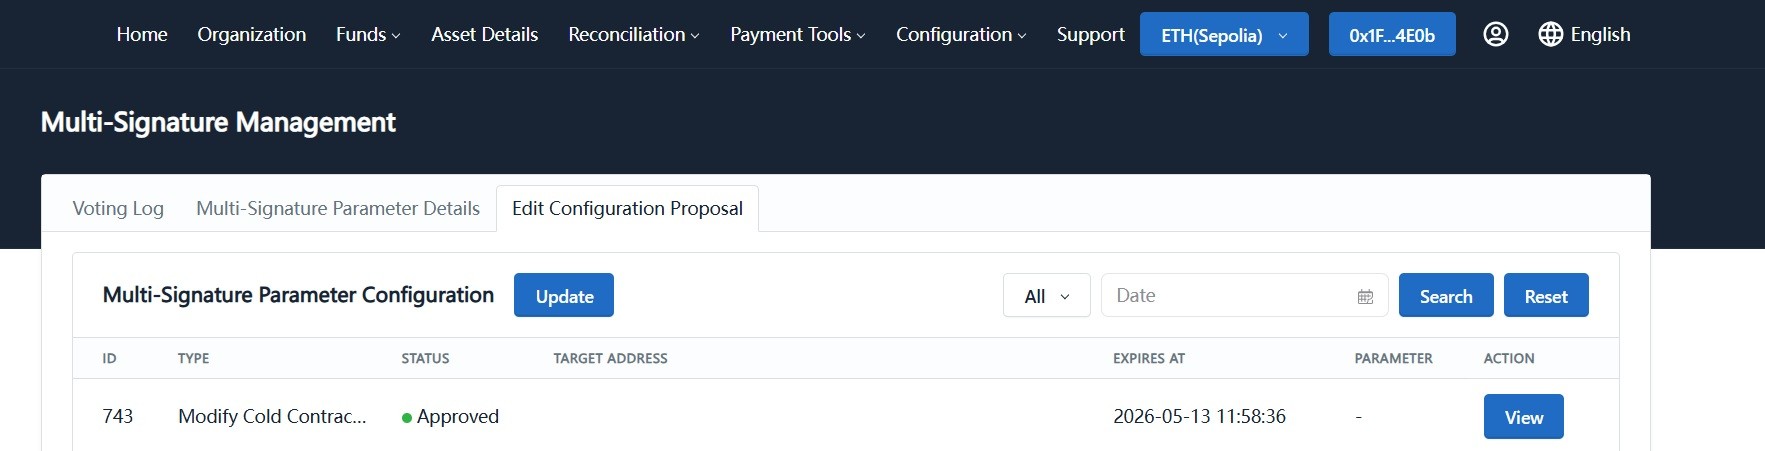
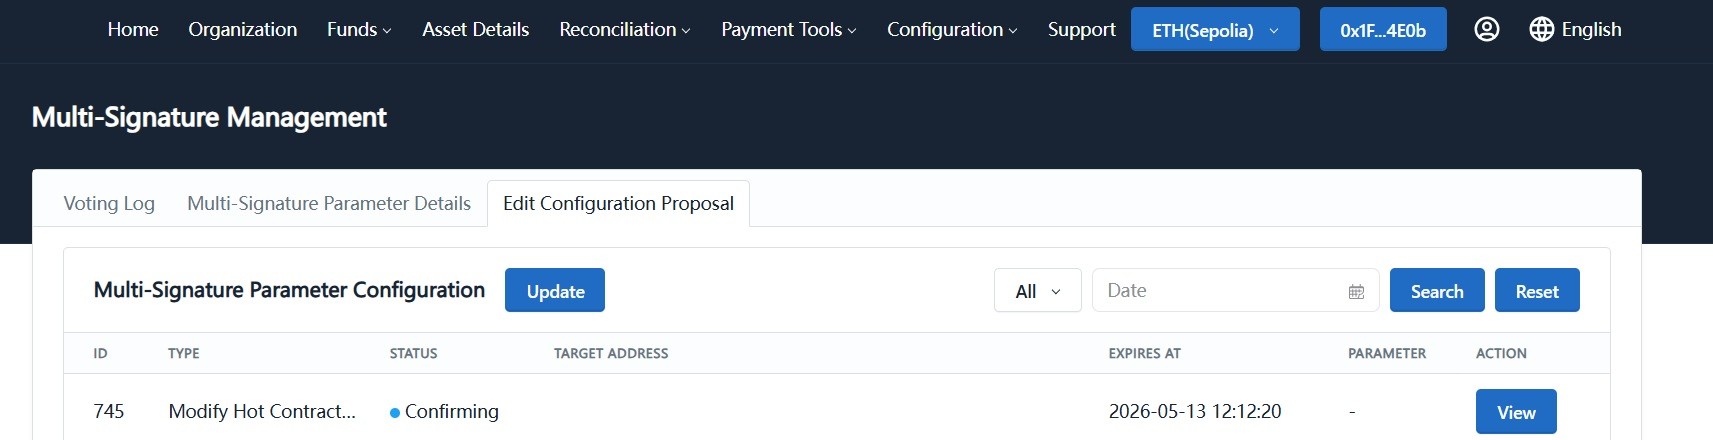
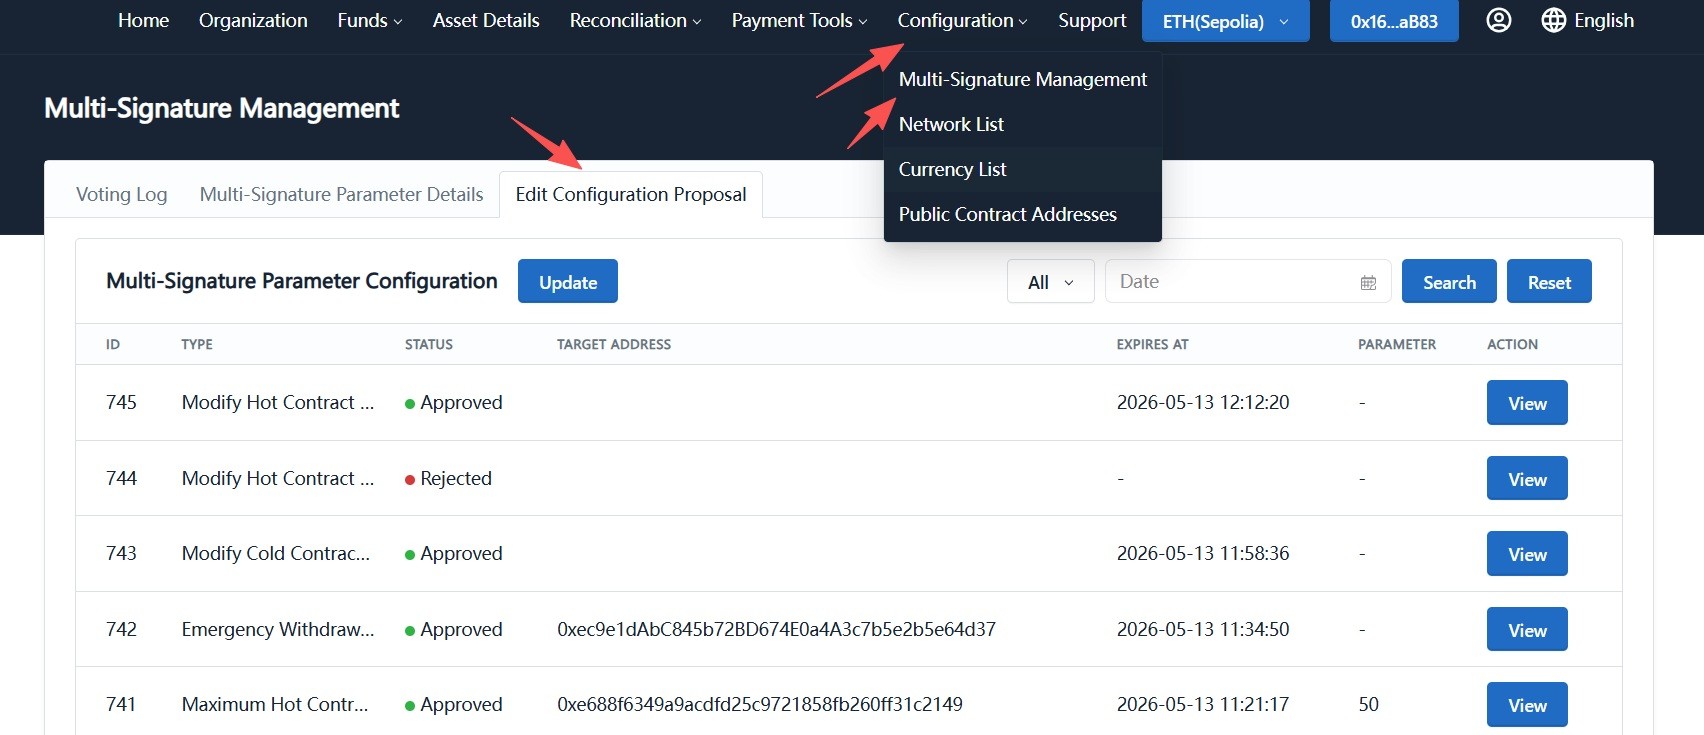
Log in with an admin wallet and go to "System Configuration -> Multi-Signature Management".
-
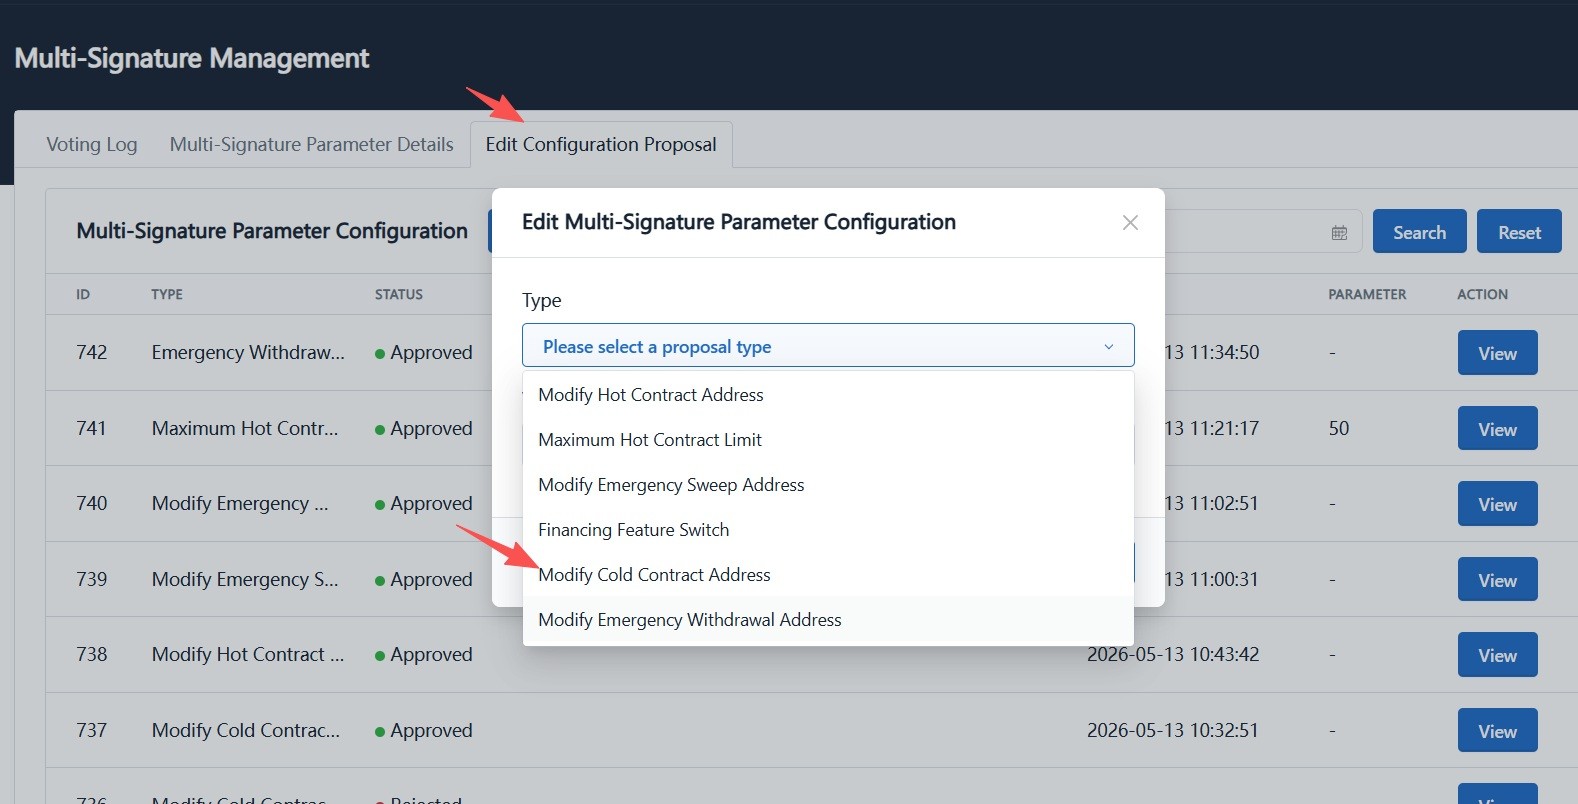
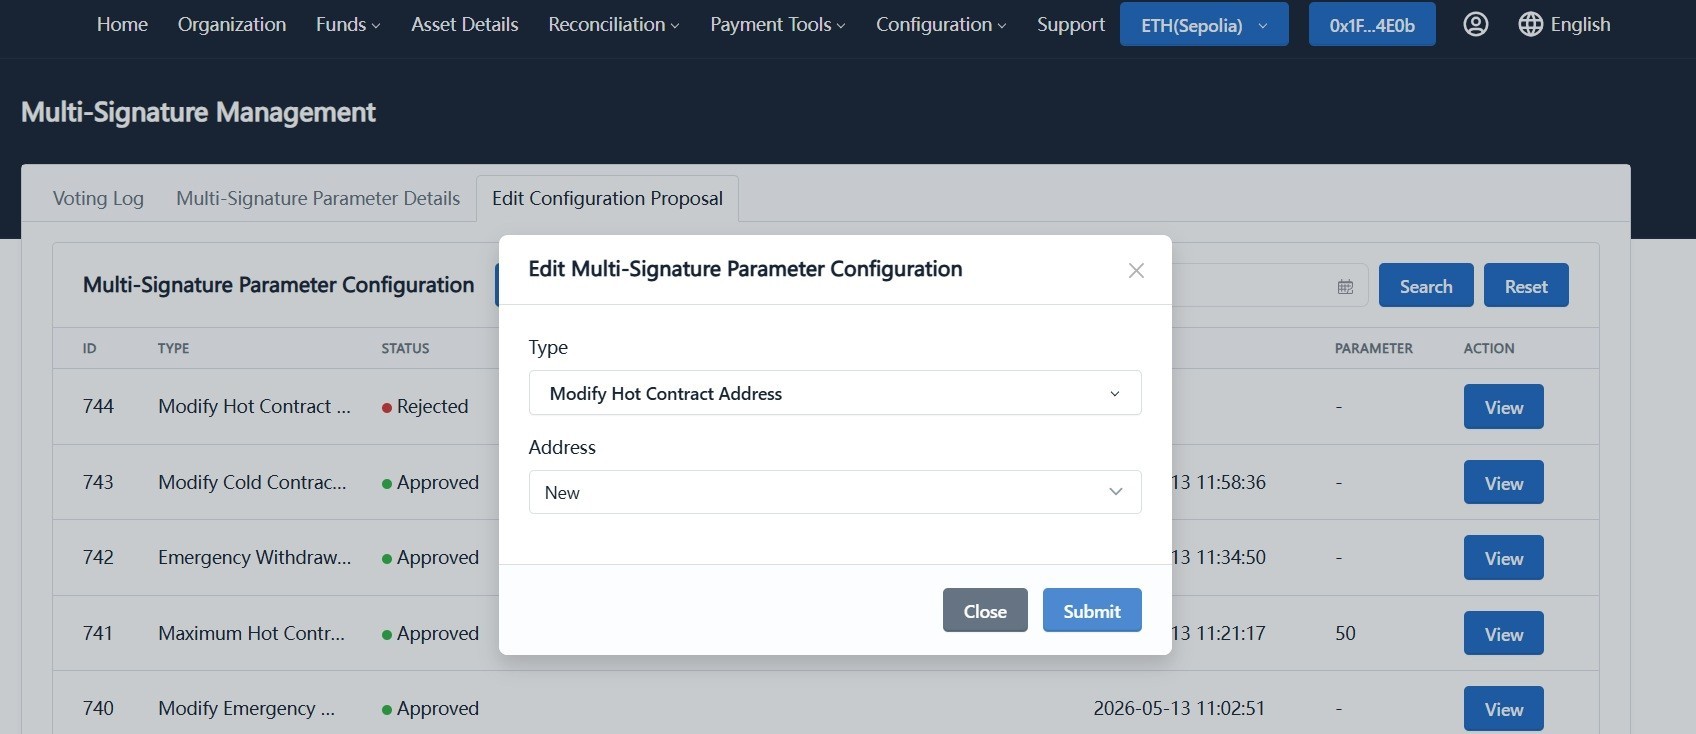
On the Multi-Signature Management page, open the "Edit Parameter Proposal" tab, click "Modify", and choose "Modify Cold Contract Address" from the "Category" dropdown.
-
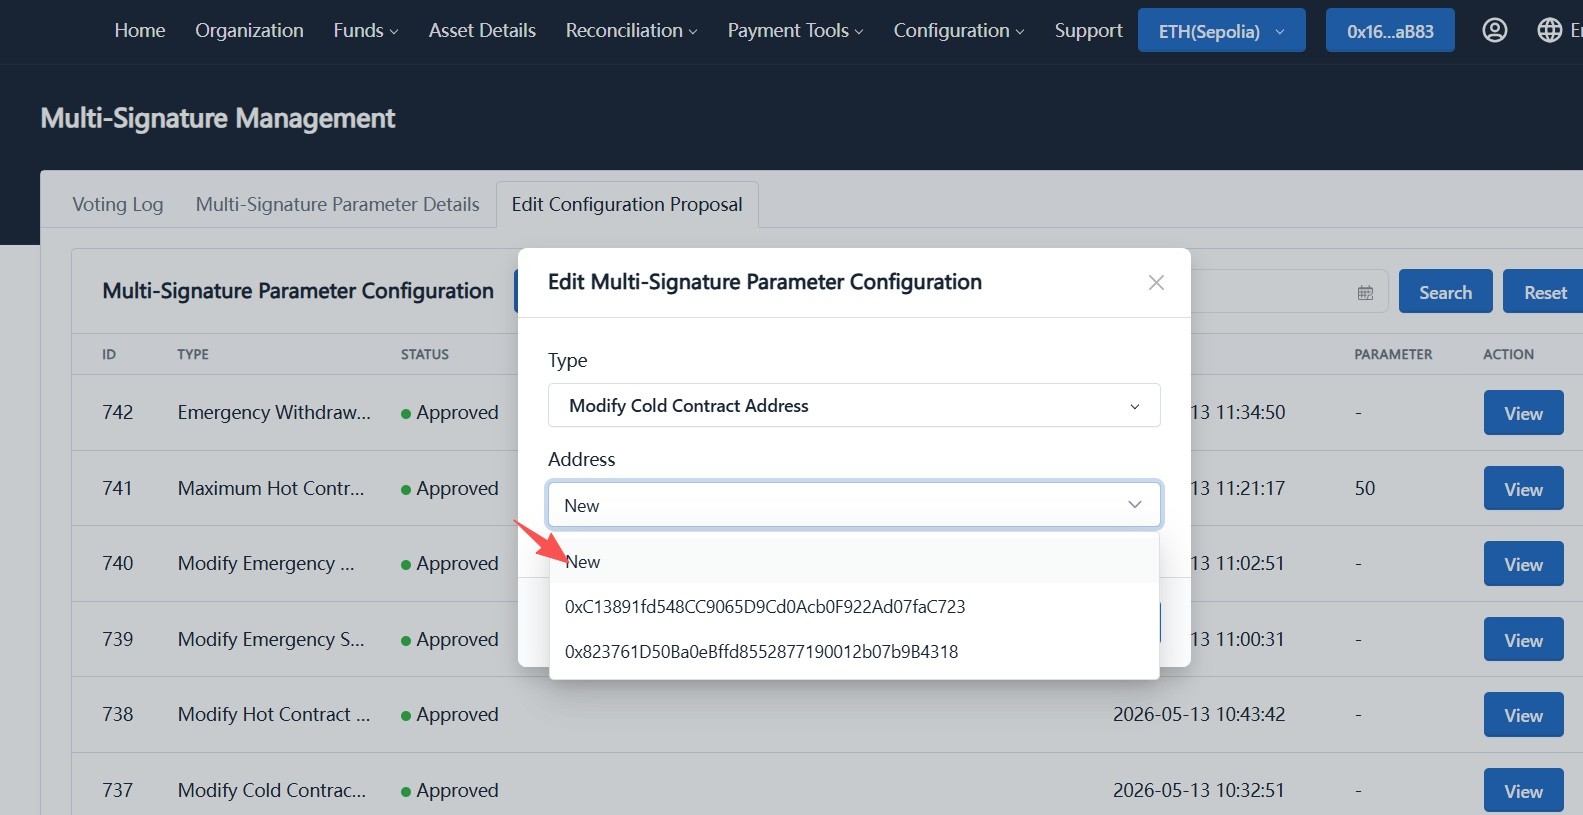
In the "Address" dropdown, choose the target cold contract address:
- If no replacement address exists, choose "New" and let the system generate a new cold contract address.
- If historical addresses exist, select one of the previously used cold contract addresses.
-
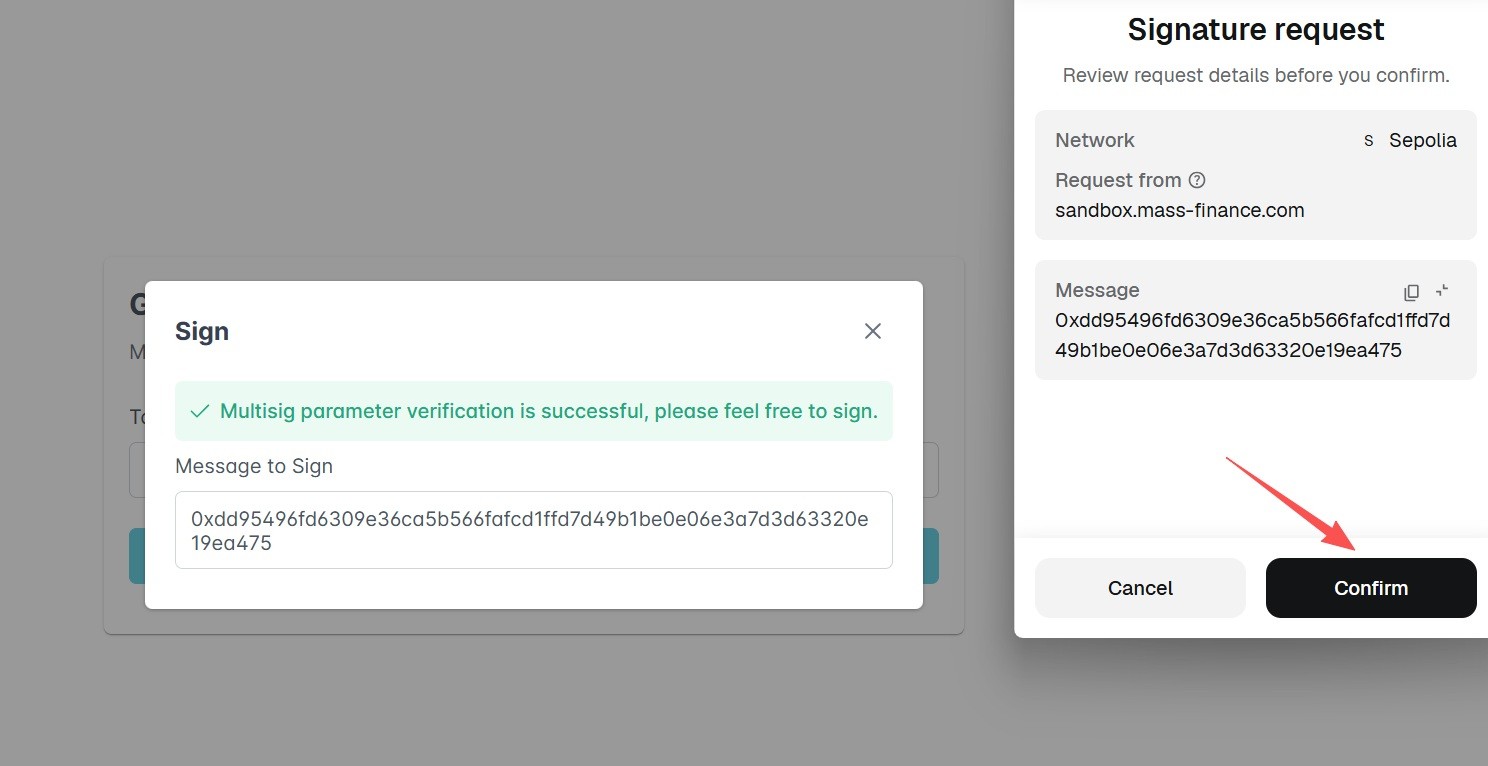
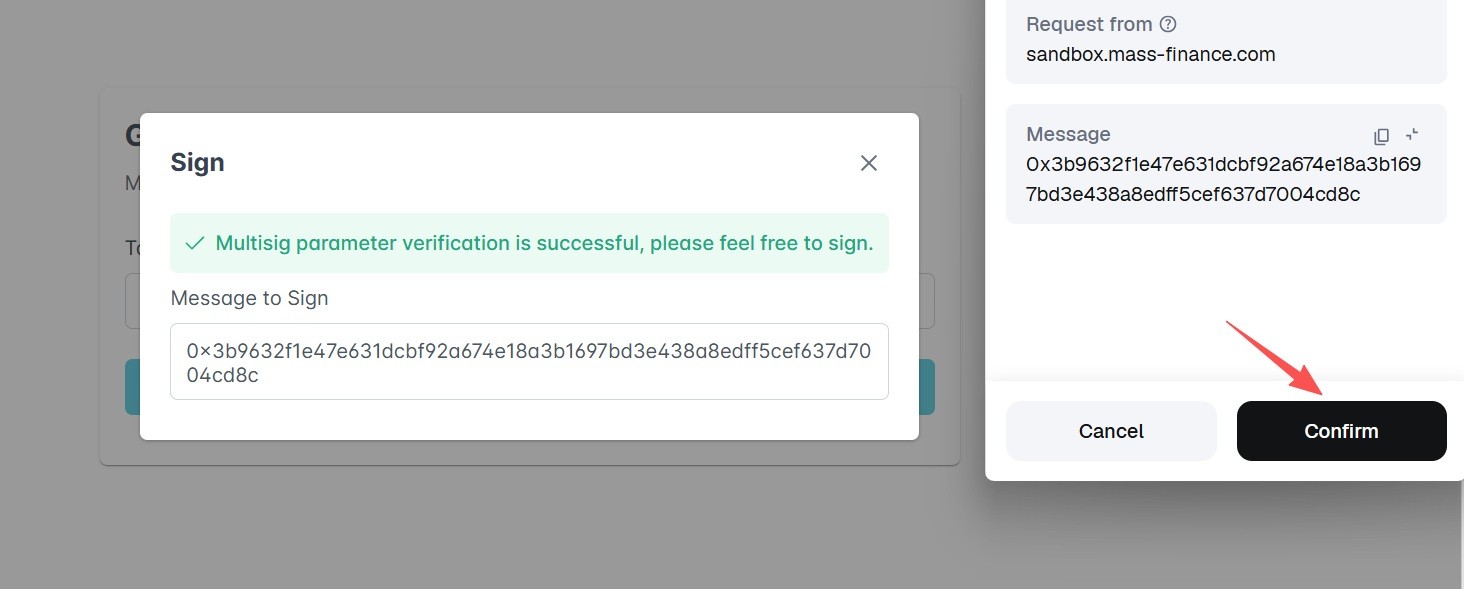
Confirm and sign with the current admin wallet to create the proposal.
-
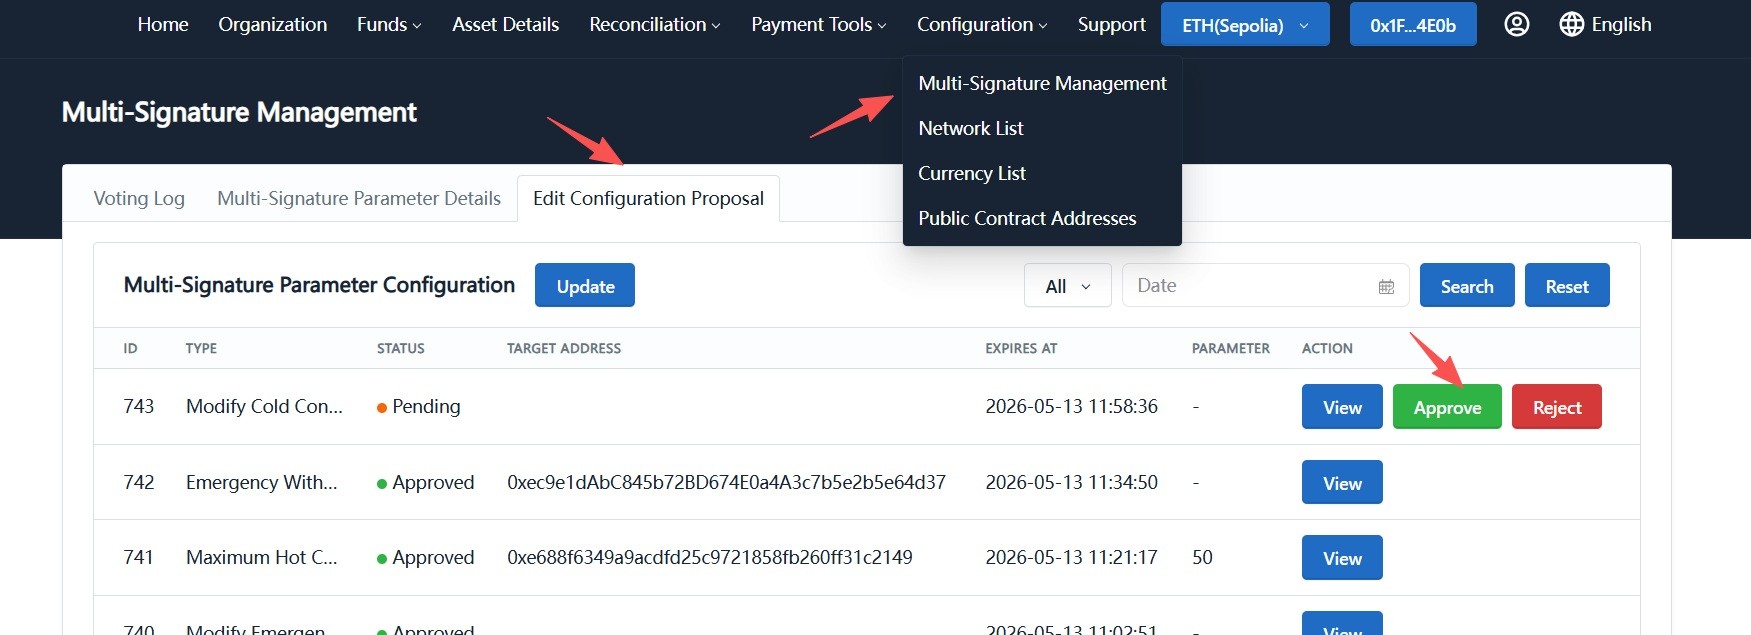
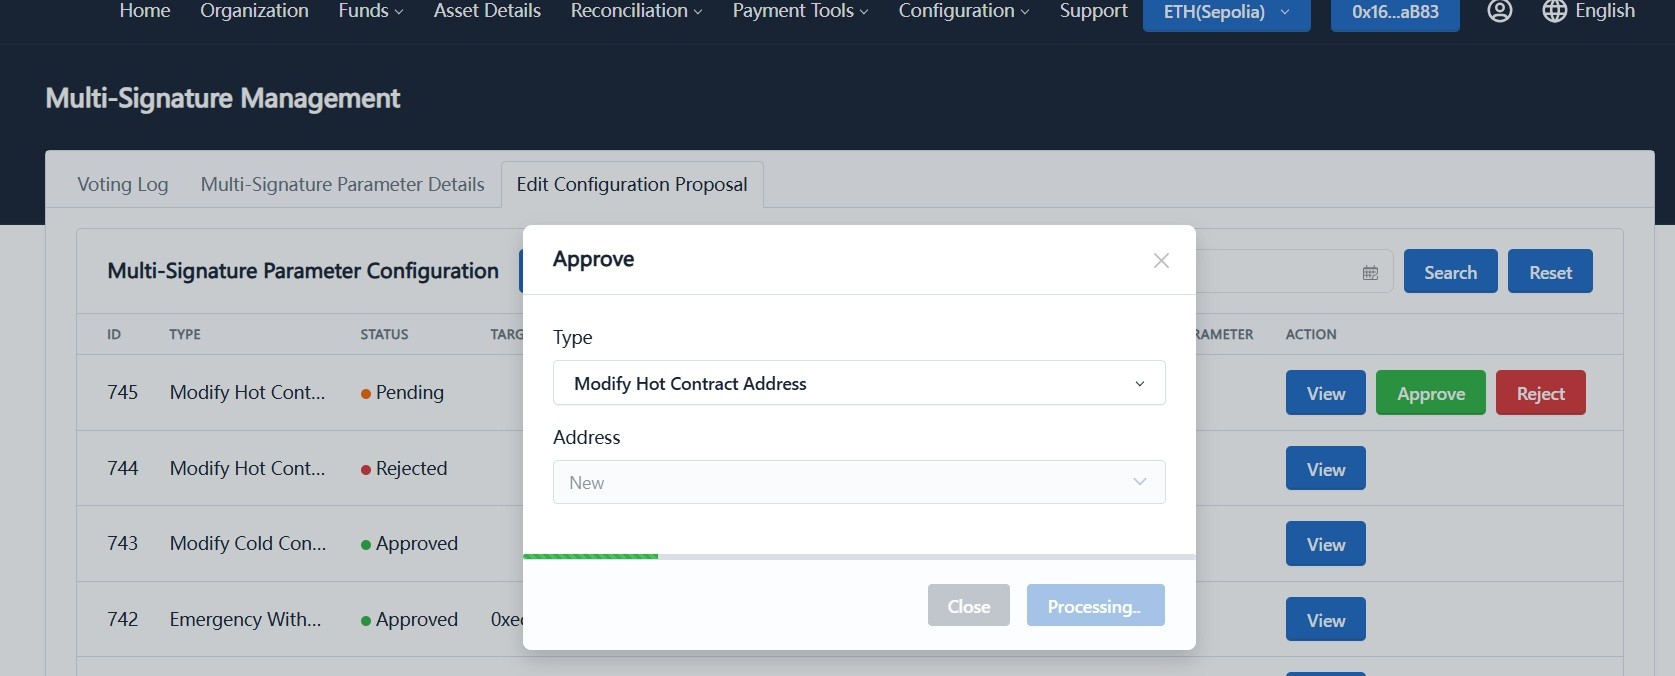
Sign out, switch to another admin wallet, go to "Multi-Signature Management -> Edit Parameter Proposal", find the pending proposal, and click "Approve".
-
Verify the details in the approval dialog, sign with the wallet, then confirm on-chain in the wallet (a small gas fee is required).
-
Wait about 1 minute. When the proposal status changes to "Approved", the cold contract address replacement is complete.
Additional Note: Hot Contract Address Update
The hot contract address update follows the same multisig proposal workflow as cold contract replacement:
-
Log in with an admin wallet, choose "Modify Hot Contract Address" in "Edit Parameter Proposal", create the proposal, and sign.
-
Switch to another admin wallet, approve the proposal, and confirm on-chain in the wallet.
-
Wait about 1 minute. Once status becomes "Approved", the hot contract address update is complete.
2. Set Emergency Sweep and Emergency Withdrawal Addresses
Overview
The Emergency Sweep Address and Emergency Withdrawal Address are used to handle funds from high-risk sub-contracts. When a merchant's receiving sub-contract is marked as high-risk or blacklisted, funds can be swept to the Emergency Sweep Address first, then moved to a safe external wallet through the Emergency Withdrawal Address. This isolates risk and protects the main contract funds.
This feature is typically used with the blacklist API. See: Blacklist API.
The full process includes three phases:
- Set the Emergency Sweep Address (multisig)
- Set the Emergency Withdrawal Address (multisig)
- Sweep funds from high-risk sub-contracts and withdraw them to an external wallet
For Standard merchants, you only need to set a hot wallet address as the Emergency Withdrawal Address. After sweep, funds go directly to this address, and no follow-up transfer proposal is required.
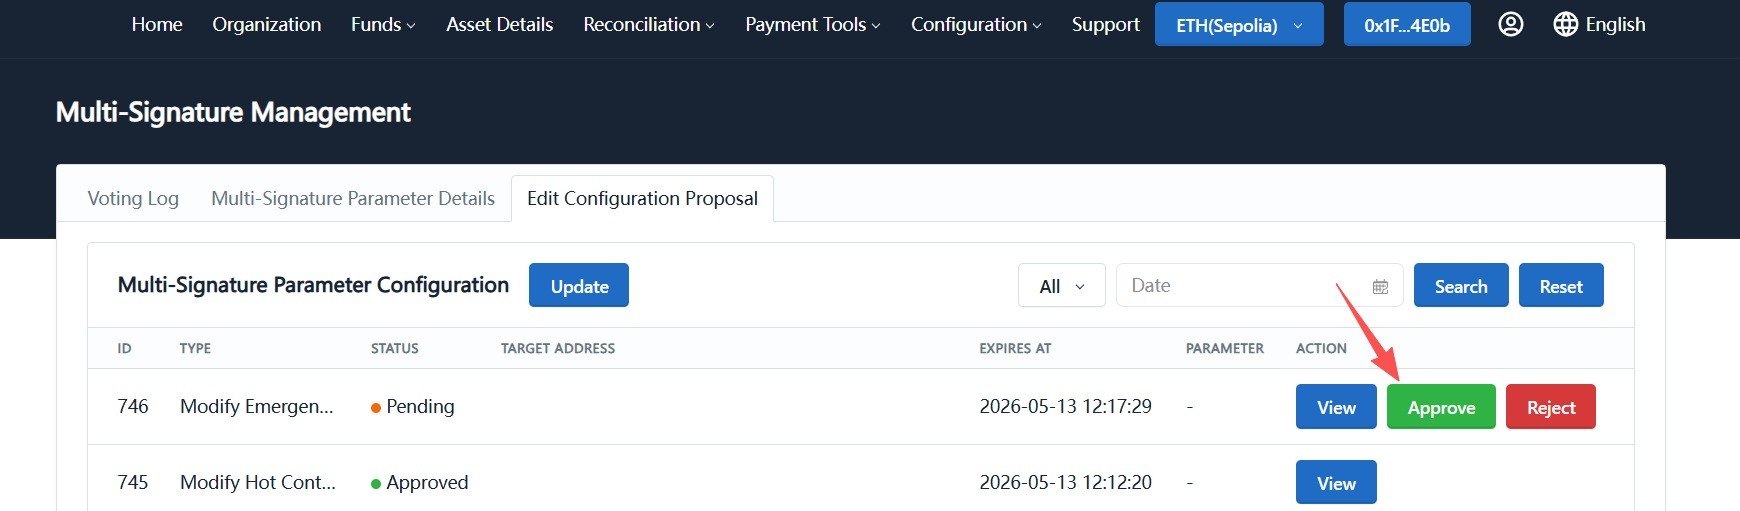
Phase 1: Set the Emergency Sweep Address
Use a multisig proposal to define the entry address for high-risk funds. Funds from blacklisted sub-contracts will be swept here first.
-
Log in with an admin wallet and go to "System Configuration -> Multi-Signature Management -> Edit Parameter Proposal".
-
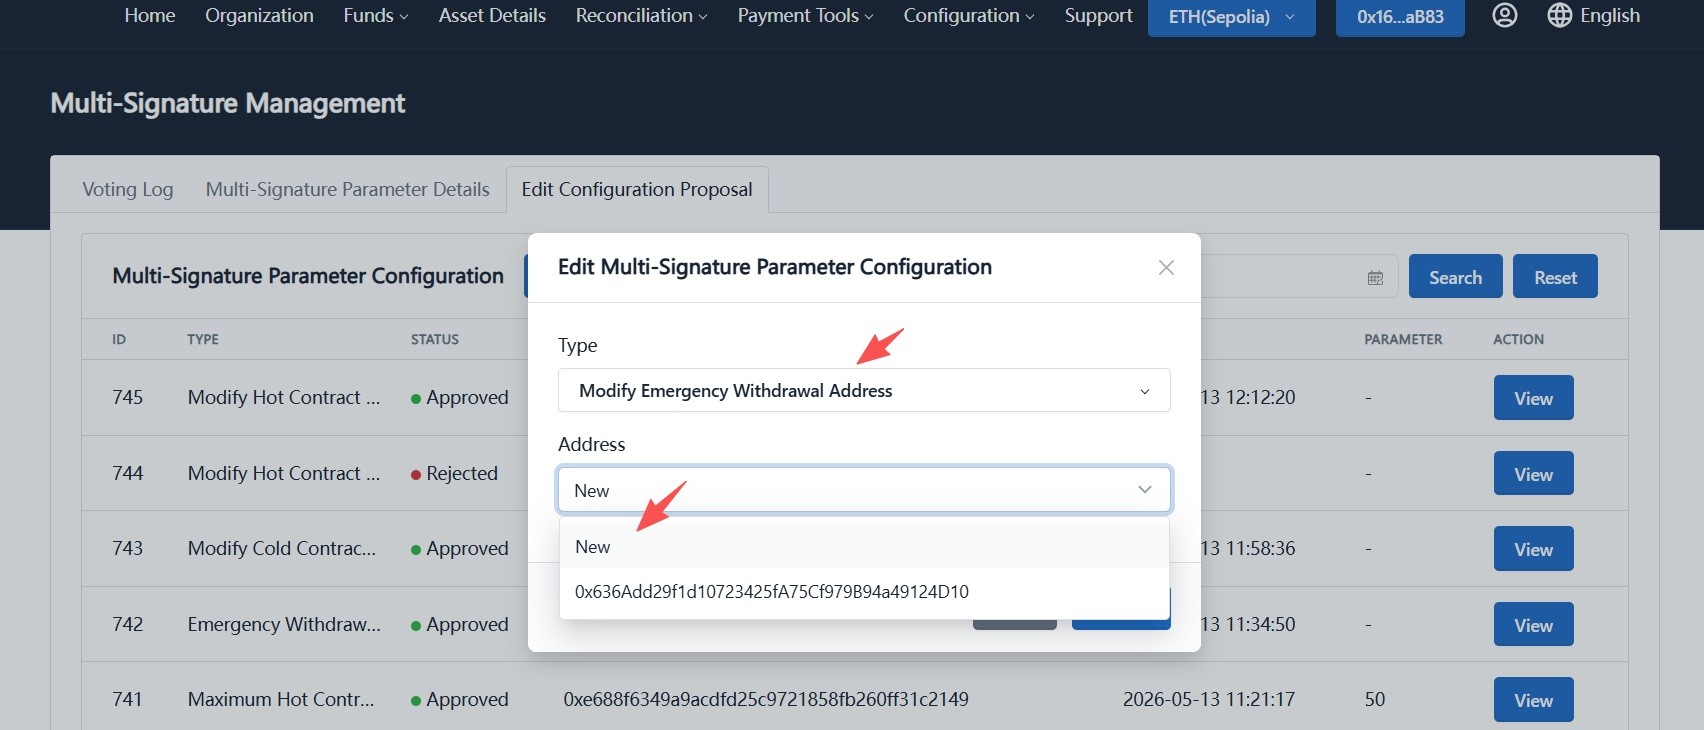
Click "Modify", choose "Modify Emergency Sweep Address" in "Category", then choose the address:
- If no Emergency Sweep Address exists yet, choose "New" to let the system generate one.
- If historical emergency sweep addresses exist, select one for replacement.
-
Connect the wallet and sign to create the proposal.
-
Sign out, switch to another admin wallet, go to "Multi-Signature Management -> Edit Parameter Proposal", find the pending proposal, and click "Approve".
-
Verify details in the approval dialog, sign with the wallet, and confirm on-chain (a small gas fee is required).
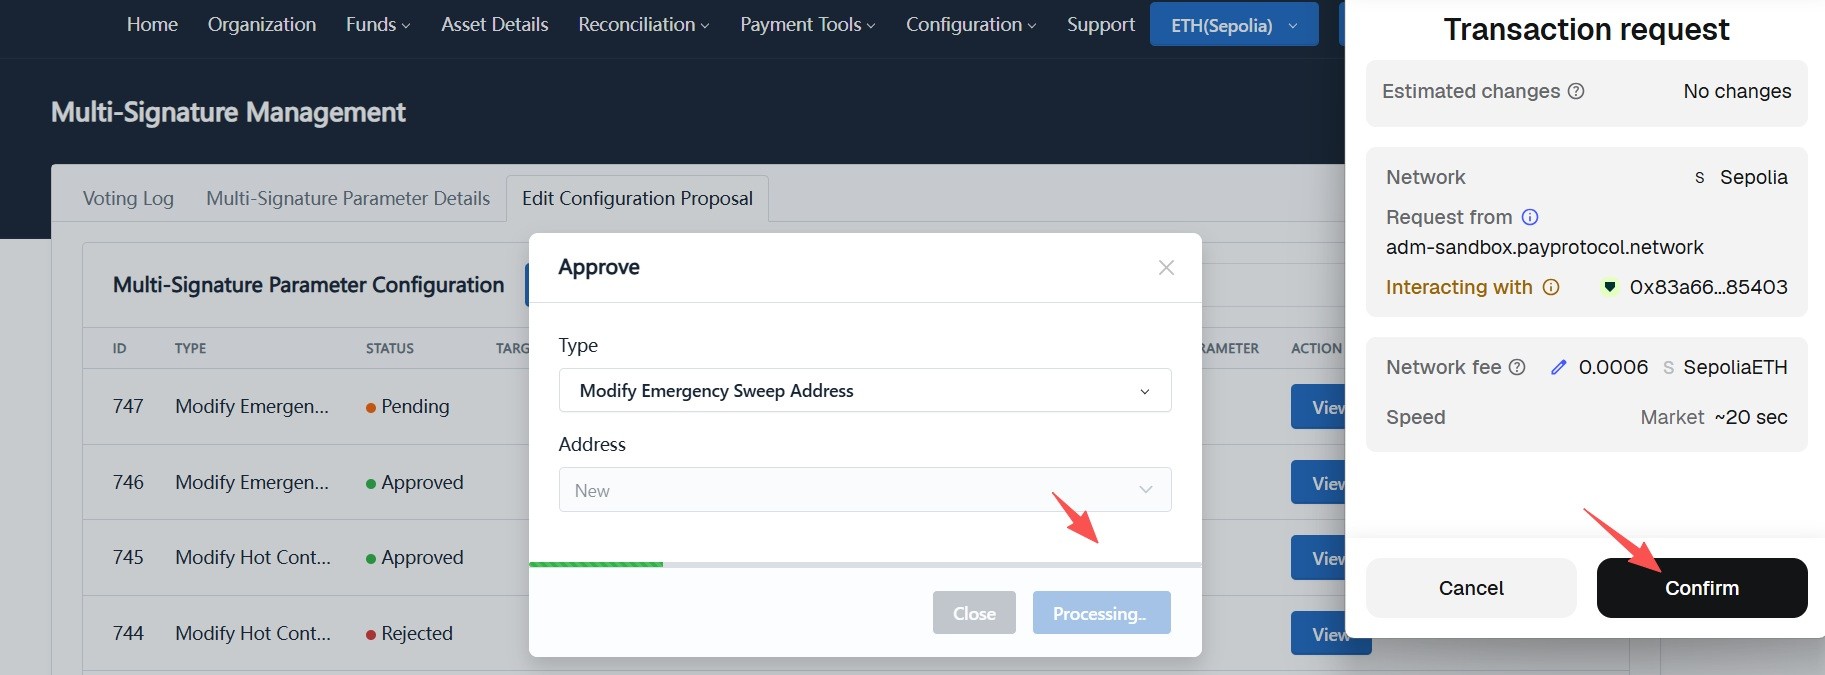
-
Wait about 1 minute. When status becomes "Approved", Emergency Sweep Address setup is complete.
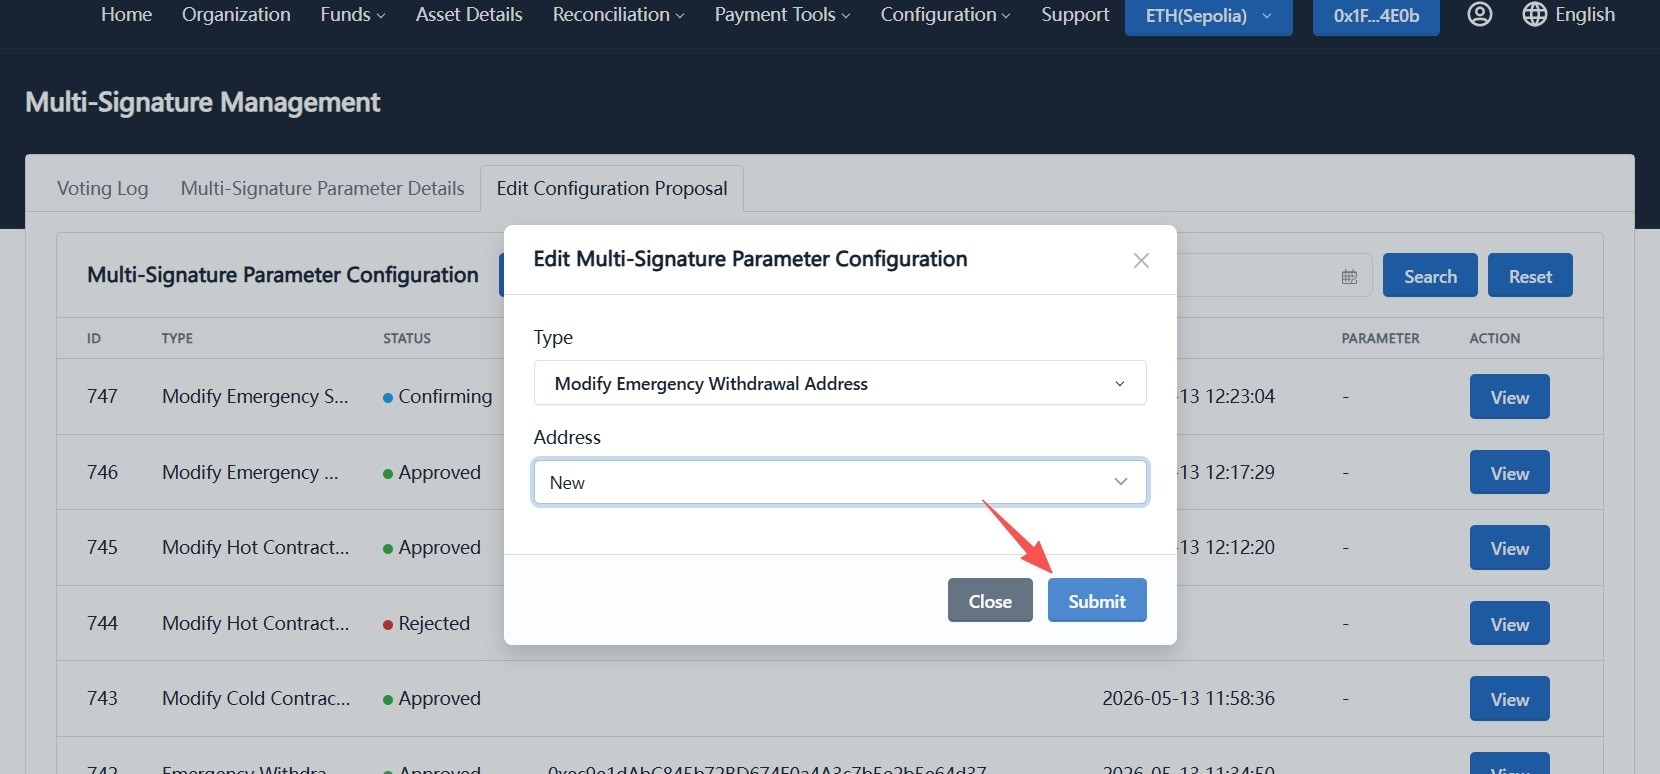
Phase 2: Set the Emergency Withdrawal Address
Use a multisig proposal to define the safe outbound address that receives funds after emergency sweep.
The setup flow is identical to Emergency Sweep Address setup. In the "Category" dropdown, choose "Modify Emergency Withdrawal Address".
-
Log in with an admin wallet, choose "Modify Emergency Withdrawal Address" in "Edit Parameter Proposal", select "New" or a historical address, click "Submit", and sign.
-
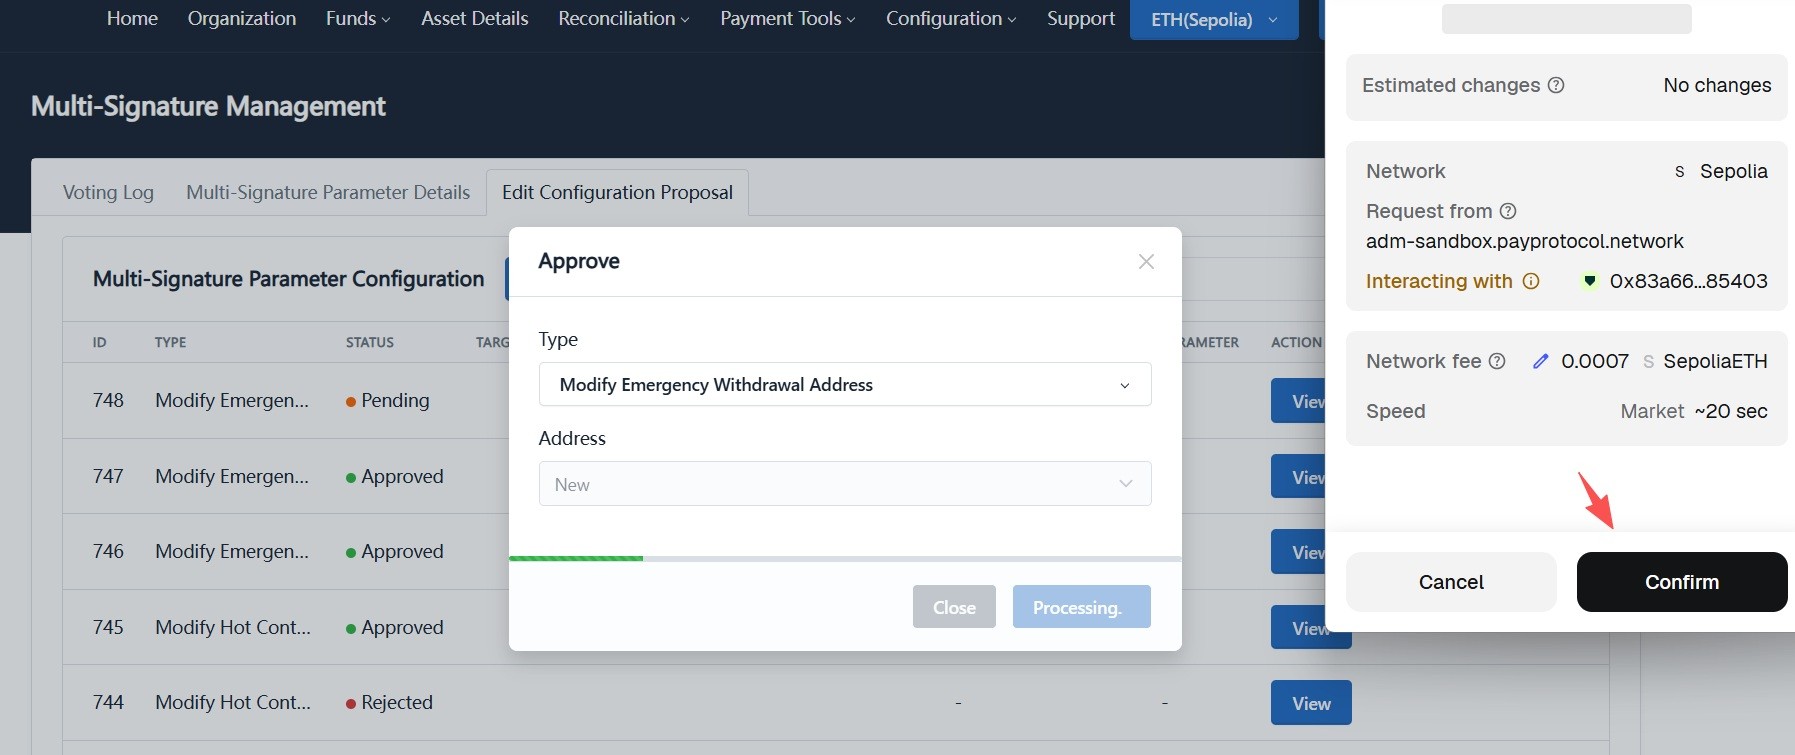
Switch to another admin wallet and approve the proposal.

-
Confirm on-chain in the wallet (a small gas fee is required), then wait for status to become "Approved".
At this phase, Standard merchants only need to set a hot wallet as the Emergency Withdrawal Address. Funds swept to the Emergency Sweep Address will then move to this hot wallet automatically, with no follow-up transfer operation.
Phase 3: Sweep High-Risk Funds and Withdraw to an External Wallet
Make sure proposals in Phase 1 and Phase 2 are both "Approved" before executing follow-up sweep and withdraw actions.
After both addresses are configured, you can sweep and withdraw funds from blacklisted sub-contracts.
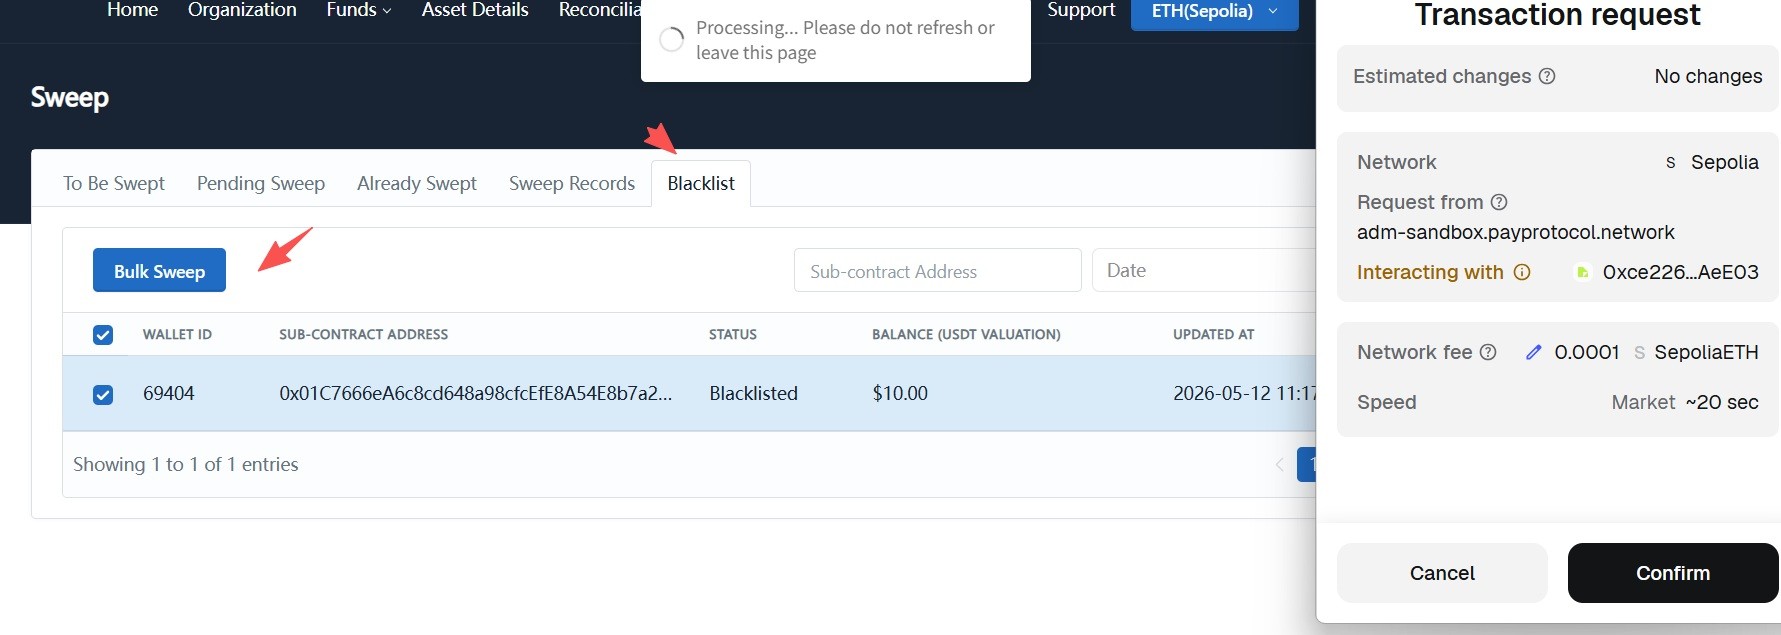
1. Sweep Funds from High-Risk Sub-Contracts
-
Go to "Funds -> Sweep".

-
Switch to the "Blacklist" tab, select the sub-contracts to sweep, and click "Batch Sweep".
-
Confirm the transaction in the wallet and wait for sweep to complete.
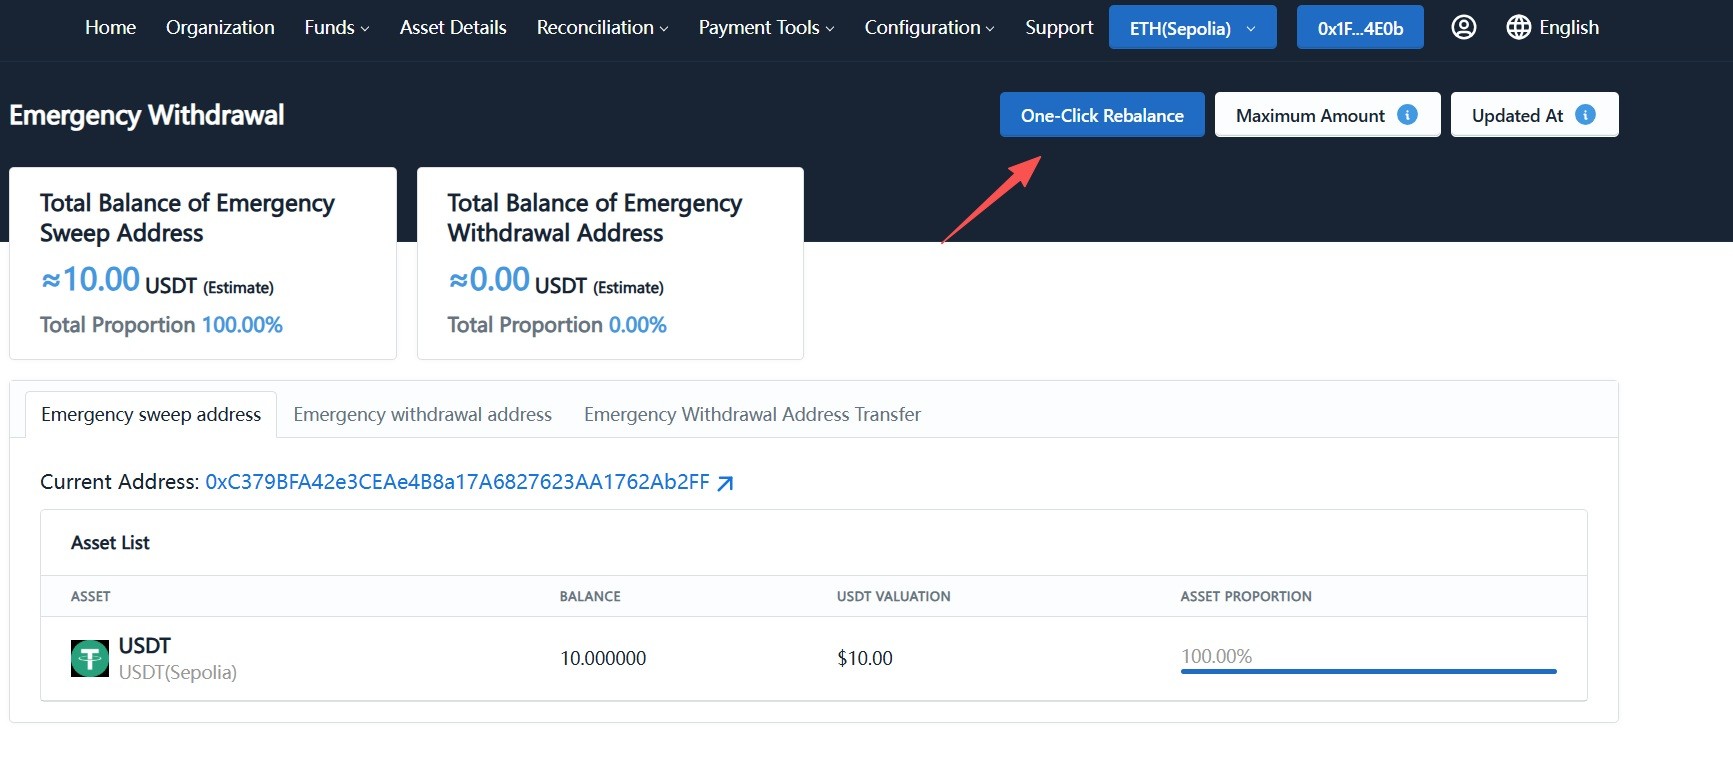
2. One-Click Rebalance from Emergency Sweep Address to Emergency Withdrawal Address
-
Go to "Asset Details" and click "Emergency Withdraw" in the top-right corner.

-
On the Emergency Withdraw page, check "Total Balance of Emergency Sweep Address". After funds are confirmed in place, click "One-Click Rebalance".
-
If the page shows "Hot contract max limit is not set for some currencies", configure hot contract limits via multisig first. See: Modify Merchant Configuration with Multisig.
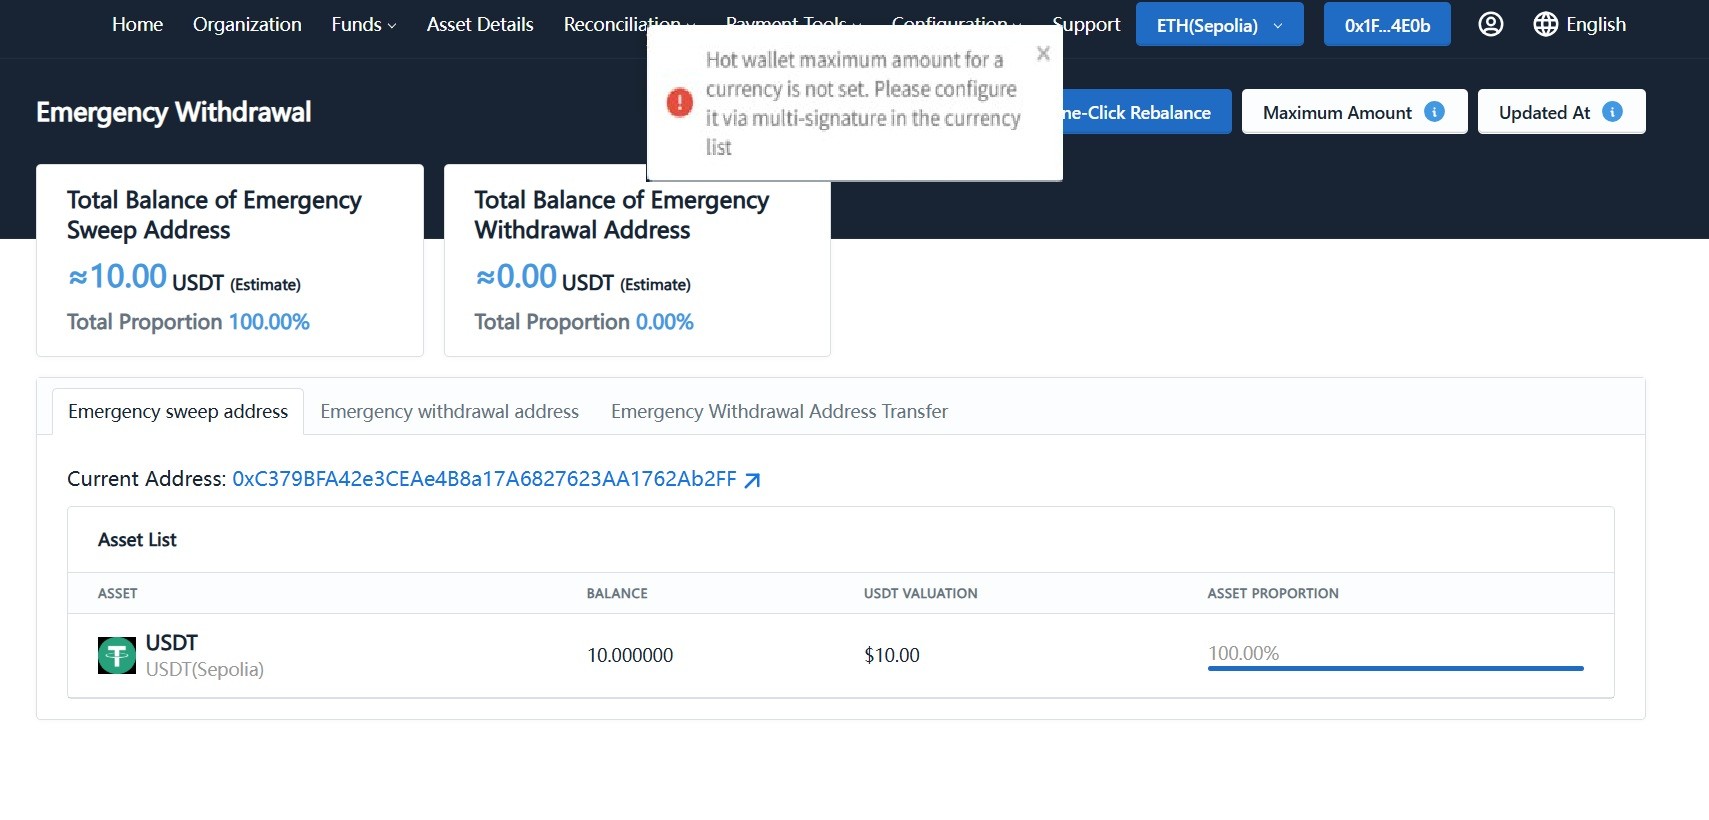
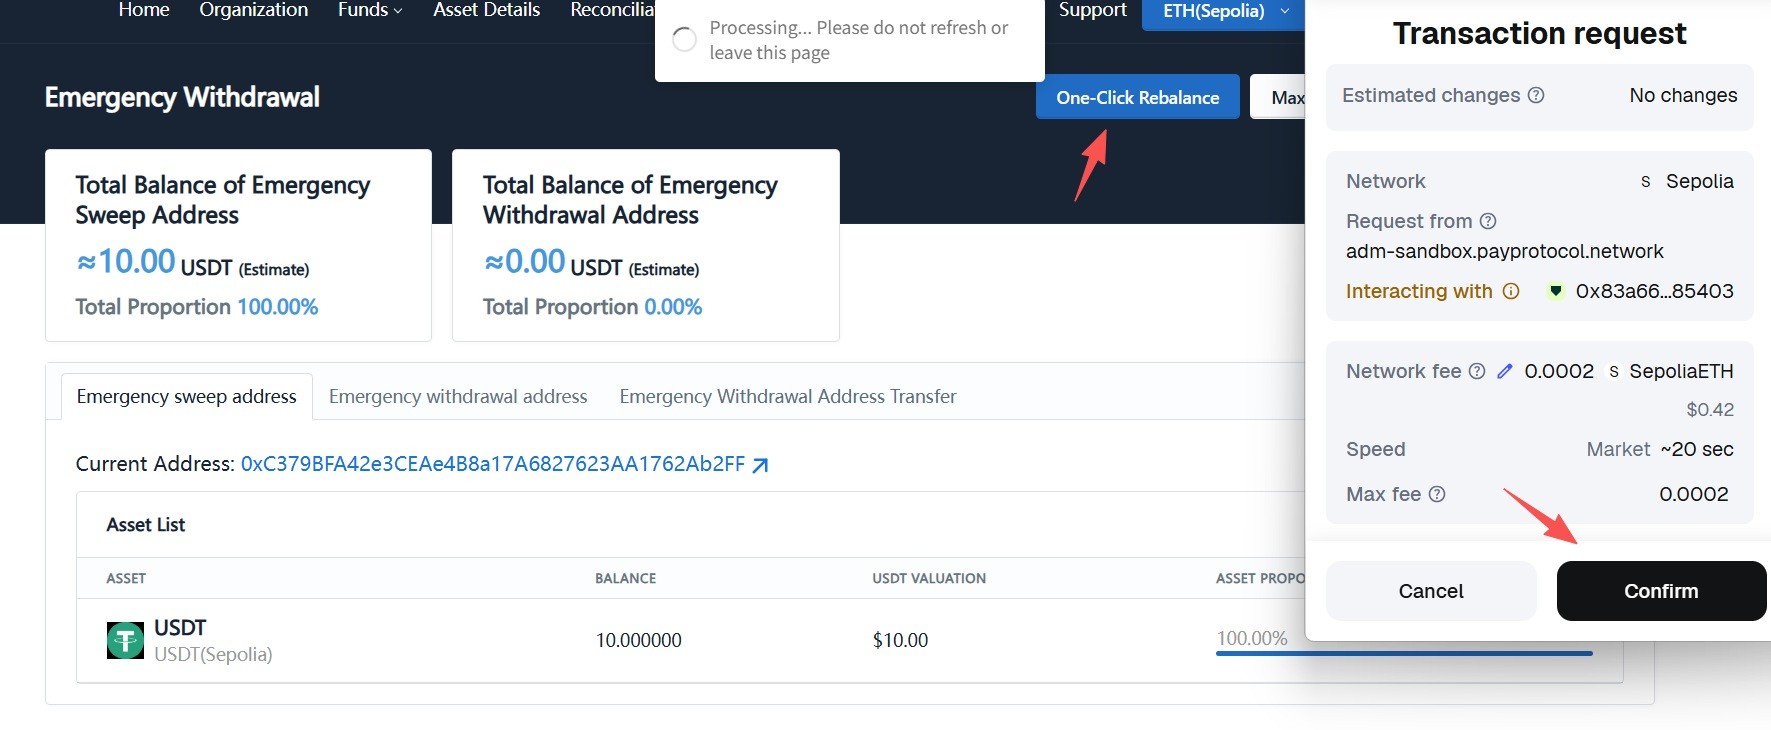
-
After configuration, click "One-Click Rebalance" again and confirm on-chain in the wallet. Funds will move from the Emergency Sweep Address to the Emergency Withdrawal Address.
For Standard merchants, funds are transferred directly to the configured emergency withdrawal hot wallet, and the process ends here. The next step, "3. Transfer from Emergency Withdrawal Address", only applies to Pro merchants.
3. Transfer from Emergency Withdrawal Address (Pro Merchants)
-
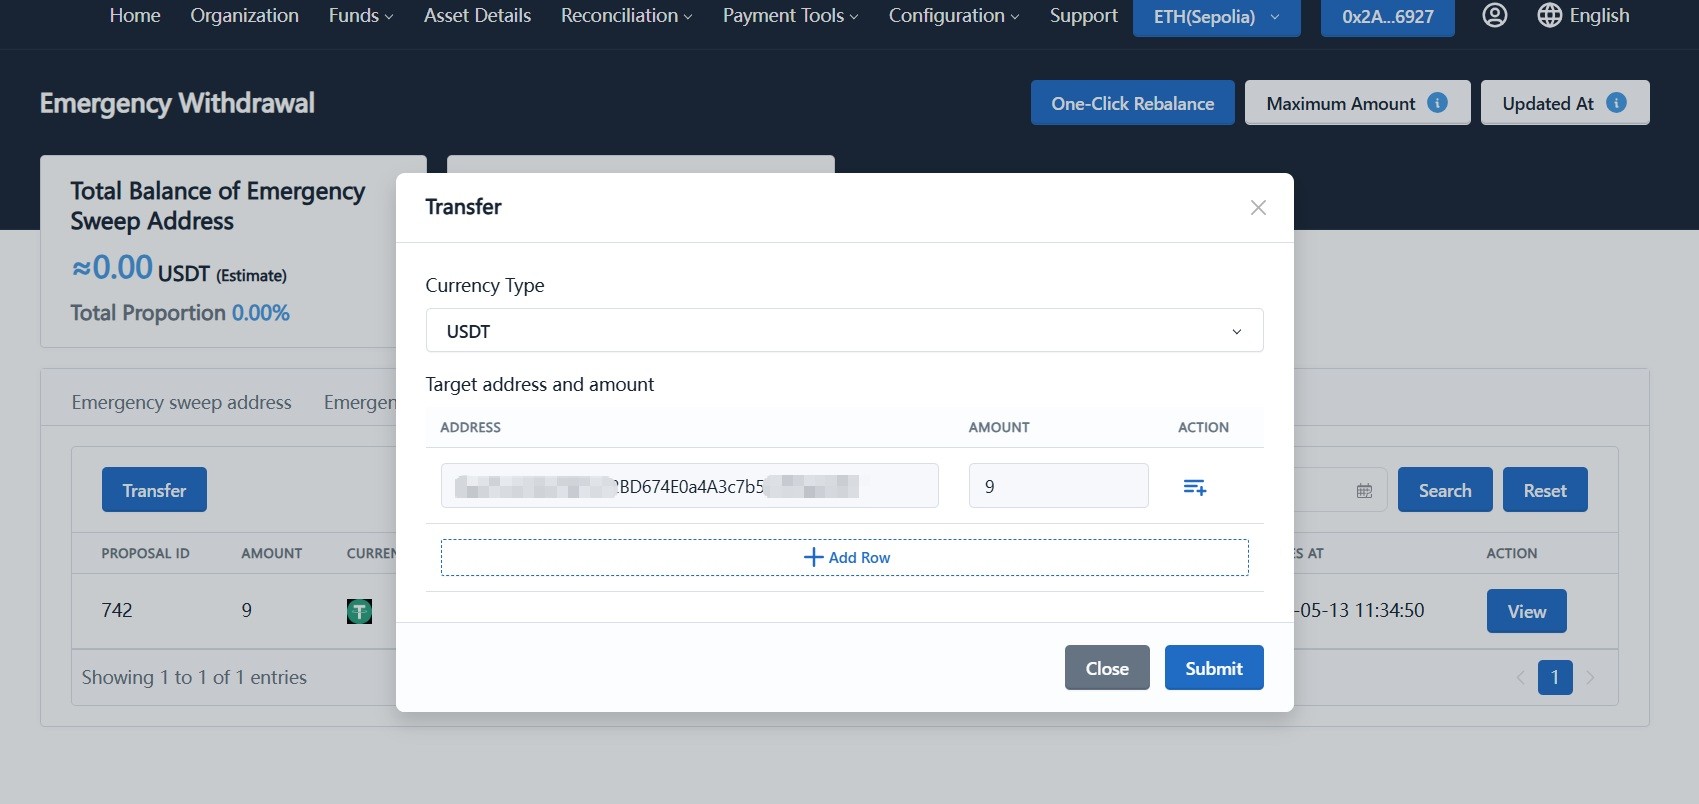
Go to "Asset Details -> Emergency Withdraw -> Transfer from Emergency Withdrawal Address" and click "Transfer".
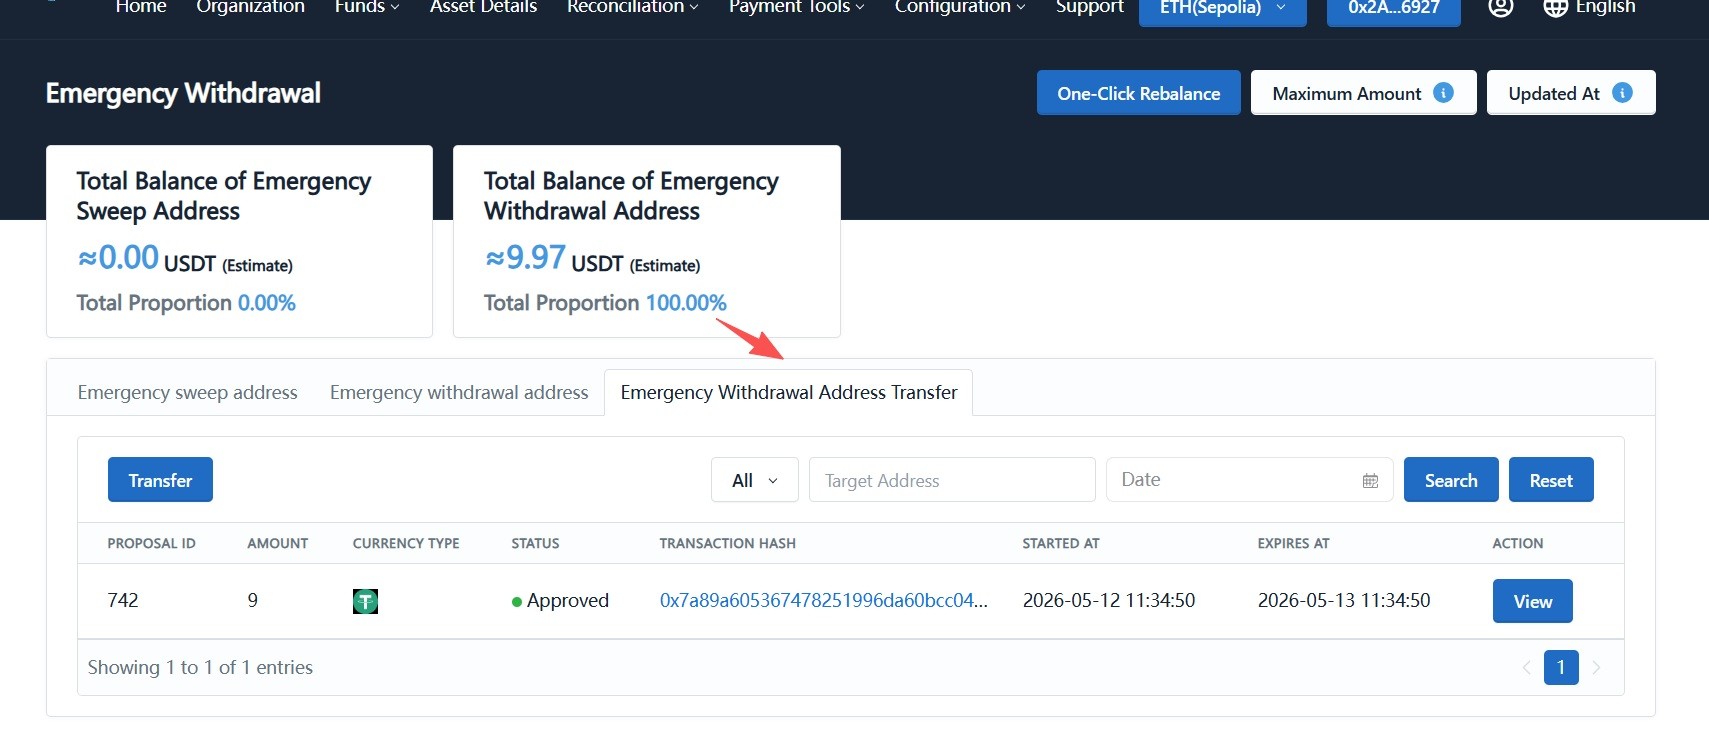
-
In the transfer dialog, choose the currency (e.g., USDT), fill in destination address and amount, optionally click "Add Row" for batch transfers, then click "Submit".
-
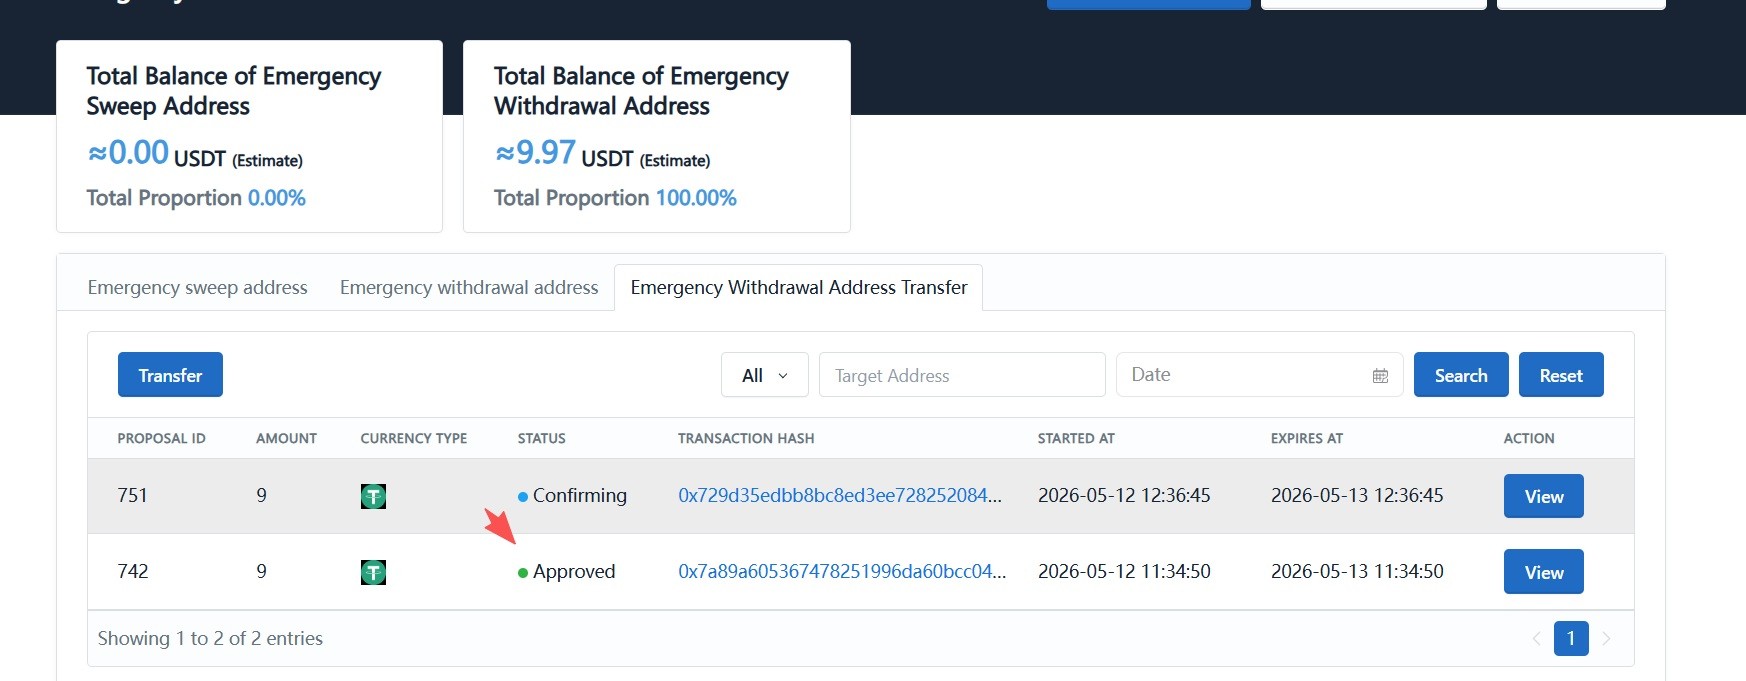
Sign the transfer proposal with the finance wallet.
-
Sign out, switch to another finance wallet, approve the transfer proposal via multisig, and confirm on-chain in the wallet.
-
Wait for confirmation. Funds in the Emergency Withdrawal Address will be transferred to the specified external wallet.